Saturday, February 5, 2011

Visual Tasting

Pbear and I grew up watching a lot of Disney movies and one of them was the famous story about Rapunzel (most probably..we watched it loong time ago ... haha). So when mama Rapunzel was pregnant with Rapunzel, she had this monstrous craving for a root vegetable. And of course in her state she only wanted to have that vegetable and of course it was grown in the good old witches' backyard.

So papa Rapunzel, worried about mama Rapunzel went to steal some of the vegetable. He eventually got caught by the witch and made a secret agreement with the witch that he would give away Rapunzel in exchange for mama Rapunzel's life....

So what we want to focus on here... is not on the story but on the vegetable. Yes the vegetable! Strange thing but Pbear and I always wondered what it is (even after growing up) and why mama Rapunzel was so darn crazy about it!

Of course about 10 odd years later we found a very similar looking vegetable. And it turned out to be a radish. We don't do radish at home, in fact the last time i had it was about 7 something years ago. Not that we hate it, but no one really thinks of it. But looking this thing from our memory and just how pretty it looked, we had to get it!
  So just a small background on this thing of beauty. This variety of radish is called "cherry belle," an appropriate name indeed :). It is also known as 'Mooli' in Hindi. It is widely consumed in asian countries like Japan, China, Korea, India etc. An interesting article on the radish 'culture' over the world can be found in this link-a. 

There are also a lot of health benefits relating to this vegetable some quick summary can be found in link-b. I wish it was also effective for the good old cholesterrrrroollllllllll.... but alas

link-c : tips on how to select a good bunch of radishes

link-d : last but not least some more recipes. (See mine first!  ;) )

SIMPLE ROASTED RADISH

Ingredients:
  1. Radish (2 to 2.5 cups after cutting)
  2. Potato (2 medium)
  3. Green Bell Pepper (1 medium, optional)
  4. Ginger (2 cloves, crushed)
  5. Oregano (1.5 tbsp)
  6. Olive oil (2 tsp)
  7. Salt, pepper
Method:

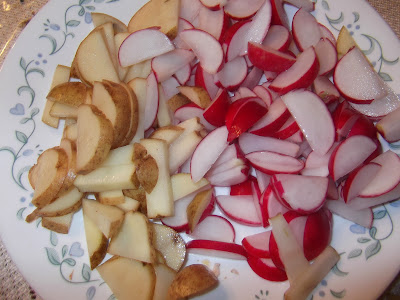
Wash and cut the radish, bell pepper (missing in the pic...whoops!) and the potatoes. They should be the same size
 Mix the oil, garlic, oregano, salt, pepper
 Mix all the ingredients and bake at 455F until the vegetables are crispy (i think it took 30-35min for me)
Before cooking, we tasted the radish raw and it had a very mild flavor as compared to its other white relative. Apparently the leafy portion of the vegetable is also edible (of course we came to know later on :) ).

After baking the potatoes and the radish went well together and the bell pepper too.

Happy cooking!

Friday, February 4, 2011

Chicken Wings

Chicken wings are the ultimate comfort food for me. Its something that gives me the same 'happy' effect that I get when I have dessert.May sound weird here, but its true.  :)

I have noticed that in a lot of restaurants they fry the chicken to 'death' ... literally! Chicken wings should be handled with care. Its ultimate taste and essence comes when it is cooked just right. The perfect chicken wing carries on the flavor as a garment and is soft and crunchy at the same time. Maybe my thoughts are going too far, but i guess a chicken wing 'fan' like myself could understand what I'm talking about!

CILANTRO CHICKEN WINGS

Ingredients:
  1. Chicken wings (5 wings, cut into 3 parts at the joints)
  2.  Yoghurt (3/4 cup)
  3. Ginger (1tsp)
  4. Garlic (2 cloves)
  5. Cilantro ((1/2 cup, roughly cut)
  6. Onion (1 medium)
  7. Lemon (1/2 medium)
  8. Spice Mix (Chili powder (1tsp), Cumin powder (3/2 tsp), dried Methi leaves (1tsp), Salt & Pepper (according to taste))
Method:
 Get all the ingredients ready
 In a food processor, process all the ingredients except the chicken. Make sure that you process until you can see small bits of the cilantro.

Tip: Taste the the mixture for adequate spices and salt before putting it in the chicken. The mixture should have a little more salt than you prefer. The reason is because when this mixture has to flavor the chicken also. The 'saltiness' kind of reduces/lessens when you bake/cook.

Add the mixture to the rest of the chicken and marinate it for .5 to 1hr
 After marination, spray some cooking oil to the cooking tray and place the chicken and then pour the marinade over it. Turn the oven on to 455F.

Tip: Put the bigger pieces on one end and the small on the other. The end that has the bigger pieces goes into the oven first. Usually the inside part of the oven is hotter than the 'opening side' or the 'other side.' So this would allow all the pieces to cook at the same rate.

I hope it makes sense ... :)
 I usually do 'eyeball' baking. Meaning, I check what is baking every 30 mins to find out when its done.

So after 30 mins in the oven, the marinade and the water from the chicken should have dehydrated a little bit.
This is the time when you have to flip them 180degrees.
 After turning it gather the surrounding marinade and put it over the flipped wind.
 When its all done, put it back in the oven
 Again after 15-30 mins it should look something like below. As you can notice, the water from the chicken is dried. Flip it again and put it in the oven. At this point the chicken is fully cooked.

But if you want it to be a little bit more crunchy on the ends, fip it back and back until it is cooked to your liking.

 After more baking:
 And its ready :)
The thing that I like most about this preparation is that there is minimal usage of oil (remember we used the cooking spray). Unlike store bought which is mostly deep-fried, this is guilt fee.

Wednesday, February 2, 2011

Bok Choy

Bok Choy was one of the most wonderful discoveries that I made recently. All I know is that it is from some cabbage family (not a botanist here..lol). It is also known as 'Chinese Cabbage.'

When cooked it has a very soft and mild texture. It dosent reek of a traditional cabbage ... hehe... literally. Its something that you will come to love from the first time.

Some tips on how to select good Bok Choy from the market can be found in this link. Also, more about its history and blah blah info can be found in link-a and link-b.

SIMPLE BOK CHOY IN OYSTER SAUCE

Ingredients
  1.  Baby Bok Choy (6-7 florets)
  2. Garlic (2-3 cloves, minced/crushed)
  3. Sesame Oil (1 tsp)
  4. Canola Oil (1tbsp)
  5. Oyster Flavor Sauce
  6. Salt, Pepper to taste
Method:
 Wash the florets lightly under running water
Here is how i cut it. I'm not sure if its the 'traditional' method, but I like it that way  :)
First remove each of the leaf stems from the center by hand. When you get to the smaller parts, just leave it as is.
 Then cut the broad white part into small pieces. Then cut the rest of the leaf into half. If the leaf is small then leave it as it is.
Wash everything again for a second time.

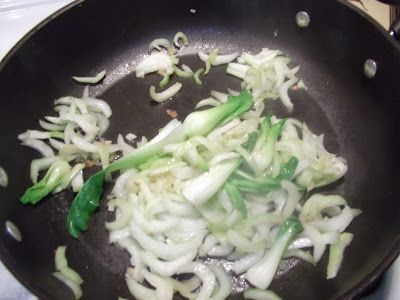
I separate the white part from the rest of the leaf because it takes longer to cook. So while cooking the white part goes in first, followed by the leaves.
Add sesame and canola oil onto the pan and let it warm. High heat is good (we are trying to simulate a wok here.... lets pretend :P )

 Next add garlic
 Stir for a minute or so.
 Add the white parts and the inner part of the bok choy
 Cover and let it steam for a bit. Bok Choy like Spinach releases a lot of water. So there are less chances of it burning.

 Stir after 2-3minutes
 When the inner parts of the Bok Choy look a little wilted, add the rest of the leaves
Next, add the Oyster Flavor Sauce

Season with pepper. Do NOT add the salt. Remember the sauce is salty by itself. Add salt at the very end if necessary.
Stir and cook in high heat until the leaves wilt. Add a little salt to adjust the seasoning and some crushed red pepper if you like it a little spicy (I skipped it here).
And its ready!
This is such a simple dish. It only take about 30 minutes (including prep time) to make it. It goes great with plain rice. However P-bear pounces on it immediately .... forgetting the rice. I love her.